See what I did there?
IT....🎈
😂😂😂😂
Well if not, you will get it soon enough...
October is one of my favorite months of the year! I love fall, Halloween, and yes, even Pumpkin Spice everything! So immediately I had to get into the Halloween spirit immediately! So wearing my skull leggings I got to crafting today and I can't wait to share my projects with you!!
I am relatively new to stamping, so I feel like I am discovering new stamp companies all the time! One of my favorites I just discovered is Kindred Stamps! Kindred has all kinds of fun geeky images that my nerd heart just loves! If you haven't checked out Kindred Stamps yet, you NEED to. So click here and check out their awesome products. I will wait... hahaha 😂
Aren't they perfect!!!
Anyways... This week Kindred Released their first set of digital stamps with the adorable set, Horror Cuties! Seeing as I am still obsessed with IT after seeing it in Imax, I felt this was the perfect place to start my Halloween crafting! Take a look at all these adorable stamps!
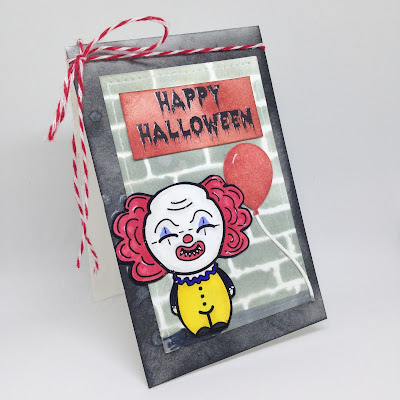
Today I made two fun cards using the Pennywise image from the set! I am not really familiar with the original movie, so I wanted to try making both a classic and modem Pennywise using the images. I printed a bunch of the images from the set several times on to Neenah 65lb Cardstock. Using my Spectrum Noir Markers and a Copic Multiliner pen I went to work coloring and altering the images.
Classic Pennywise Mini - Card
Keeping the image as-is, I colored the image using my Spectrum Noir alcohol markers.
Colors Used:
Hair: CR8 and CR11
Face: IG1 for shading of the face; TB3 for above the eyes; CR8 for mouth and nose
Clothes: TB6 for sleeves and ruffles; CT2, CT3, and CT4 for the body; IG10 for the shoes
Additional: True Black for the sides and a white gel pen for accents and the teeth
Once he was all colored I fussy cut out the image and added black to the edges using a marker to make it look like a finished product.
For the card base, I took a standard size card base that I already had premade and folded. The dimensions were 5.5" by 4.25". I then cut the card directly in half at 2.75" making the card 2.75" x 4.25". This gives me two mini cards to work with!
Then I began my work on the background elements! I cut out a small rectangle using the Stitched Rectangle die set from Lawn Fawn. I choose one of the smaller ones since I knew this was going to be a small card. I also used the Party Balloons die set from Lawn Fawn for the balloon and string.
Then I taped the stitched rectangle to the back of my Tim Holtz Layered Brick Stencil and began applying the Distress Oxide ink with a dauber. For the bricks I used the Iced Spruce color. I then just applied regular distress inks to the card base, sentiment, and balloon. (The sentiment was just typed up and printed when I printed the images) For the balloon and sentiment background I used Fired Brick Distress Ink and I used Black Soot Distress Ink for the card base. I apply some water droplets to the card base using a mister and picked up the excess water with a cloth. This resulted in the cool water droplet effect.
I then adhered everything together using a generic tape runner and tied a piece of twine to the top just to add some extra flair. Once things were applied I added just a little bit of gray to the bottom of the rectangle so it didn't look like Pennywise was floating, (however that may have been appropriate since they all float right?) From start to finish this card took about 15 minutes which is great! These images are so cute and make for some perfectly spooky Halloween Cards!
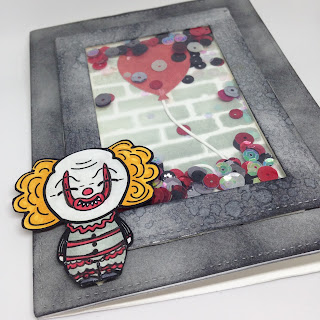
Modern Pennywise Shaker Card
This was my second Pennywise card using the Kindred Stamps set! I have wanted to try making a shaker card and this was my first attempt! Trust me, it is far from perfect but I will share what I learned along the way!
Personally, I have never been much of a scary movies person. But my fiancé was so excited for the new movie that he dragged me to see it! And honestly I was terrified but I loved it! I was really impressed with the art direction of the film. It had a much different look and feel than the original but with the same great 80's feel. I wanted to capture that version of Pennywise using this stamp set so I had to alter some things. The above card used the image as-is, but for this card, I used the Copic Multiliner again to add more detail to the clown.
First off I drew the red lines extending from the mouth and past the eyes. I actually started with the red marker and then outlined with the Copic Multiliner, This way I could avoid accidently coloring outside of the lines on his face. I then drew in the stripes and ruffles on his body, as well as adding in as little pompom on his shows. It was a quick way to change the feel of their clown, and I think captured the unique attire of the new film's version.
Colors Used:
Hair: OR1 applied inlayers for shading
Face: IG1 for shading of the face; CR8 for Makeup, mouth, and nose
Clothes: IG2 and IG4 for his clothes; CR8 for accents on the clothes, IG10 for the shoes
Additional: True Black for the sides and a white gel pen for accents and the teeth
I used the Stitched Rectangle die set from Lawn Fawn for the card base and insert. I used the largest three sizes. The largest for the card base and the other two to make the frame. Using the Black Soot Distress Ink, I colored in both pieces of the background using a dauber. Using the same technique discussed above, I made another brick background using one of the stitched rectangles and another balloon. This was then adhered to the card base.
I attached the acetate sheet to the back of the frame using super sticky double sided tape. I then put a layer of foam tape on the back side of the frame. **NOTE: I should have doubled up the foam tape! I recommend using two layers of foam tape. This will help the sequins shake around better.** Then I used a static reducing powdered tool and made sure the card base was coated as well as the frame. This prevents the sequins from getting stuck or sticking to a corner.
Then choose your sequin mix and add them to the card base! I choose black, reds, and iridescent sequins and glitter. I set them in a pile on top of the balloon which I knew would be far enough away from the sides. Then I removed the backing on the foam tape and applied the frame to the card base. Once everything was secure, I attached Pennywise to the card using more foam tape. On the parts of his body that were hanging off the frame, I doubled up on the foam tape for extra support.
And that's it! This card was a little more time consuming but I love it! Shaker cards are so much fun!!!
Hope you all enjoyed these fun and spooky Halloween cards! Leave me a comment and let me know what you think! I would love to hear from you! Cant wait to share more cards using these spooky sets from Kindred Stamps! Don't forget to follow us on Instagram here for first looks at our latest projects!
Besos 💋
~ Becca


No comments:
Post a Comment