Friday, January 12, 2018

Birthday Card Fit For a Princess

Next month my beautiful niece is turning one! I cant believe it! For her birthday, her parents have asked for everyone to write a card for her that she will open on her 16th birthday. It's like a birthday time capsule which i think is really fun! I wanted to make a card that will be extra fun for her to open when she is older but still would be cute for a first birthday too.

When trying to decide what theme I wanted to go with I of course jumped to my favorite stamp company Kindred Stamps!

Kindred Stamps

Out of all the sets I have from them right now, one of my favorites is still Tower Princess. This stamp set is so cute and I felt would be perfect for a first birthday card for my princess loving niece! 

2x6 Tower Princess Clear Rubber Stamp Set


To start, I stamped the images I wanted to use on Neenah 80lb solar white cardstock with my memento tuxedo black ink. I made one of the princess and lots of the floating lanterns to use in the shaker window of my card. I then colored the images using copic markers. I am not very good at copics yet, so I just did basic coloring on all of the pieces. I fussy cut the images out and then lined the sides with my black marker to make them look like they were cut out perfectly. I then added Wink of Stella to the dress and some of the lanterns. 


Once all that was done I began work on the background! I cut out two stitched rectangles using the Lawn Fawn dies. Then using a generic square, I cut a window in one of the rectangles that would be used for the shaker window later. On the other card. I used distress inks and distress oxide inks to make the backdrop. I loved the way it turned out!


I created my own sequin mix to use in the shaker window. It's so fun and sparkly! I can't wait to see how it will look in the card! 


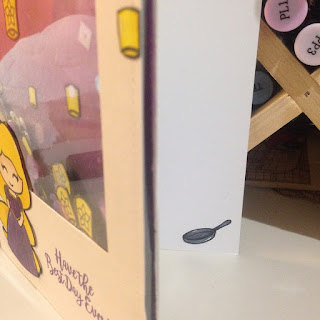
I cut two layers of craft foam that would support the top layer of my card. I then glued them onto the back of the front panel that I had embossed my sentiment on. I used my Tombo adhesive and let it sit overnight to dry. Then I added the sequins and adhered the items to the front of the card making it complete! I also added a little something to the inside just to make it more fun! Here is how the finished project turned out!


If you love this card, be sure to check out Kindred Stamps for lots of cute stamp designs! Click here to get 10% off your first order with my referral code! πŸ’œ


Supplies: 

Die - Lawn Fawn Stitched Rectangle Die, Generic square die
Ink - Memento Tuxedo Black Ink, Versafine Watermark Ink (Clear), Distress Inks (see colors above), Distress Oxide Inks (see colors above)
Coloring - Copic Markers
Embossing Powder - Recollections Purple Embossing Powder
Extras - Homemade Sequin Mix, Wink of Stella (Clear), Craft Foam, Acetate,   

πŸ’‹ Besos,  
          Becca

Tuesday, November 7, 2017

Unboxing: Brutus Monroe Stamp Club - November 2017

Welcome to my new series...

🎁 Unboxing 🎁

I am still a struggling college student trying to make ends meet, but that doesn't mean I can't have a little fun too! The Unboxing Series is my way to help others who are on a budget know what is worthwhile and how to get the most out of their subscription items. In this series I will be reviewing the subscriptions on the following elements - Value, Quality, Creativity, Usefulness, and Overall Satisfaction.

Starting this series off with...

Unboxing: Brutus Monroe Stamp Club
Brutus|Monroe


If you haven't heard of Brutus Monroe, don't worry, I just recently discovered them too! They are an awesome craft company with funky and innovative designs. Honestly their style, ambition, and innovation reminds me a lot of Tim Holtz! So who knows, they may be the next big thing in crafting very soon! Anyways, you should definitely check them out here because there is only so much I can say! They are definitely worth checking out yourself.

They have a Stamp of the Month Club that is just $5 a month! That INCLUDES Shipping (clearly I am excited about that)! At that price it is cheaper than a coffee! Clearly a sacrifice I am capable of making so I had to try this one out! According to their website, the Stamp Club stamps are exclusively designed by Brutus Monroe and shipped by the 15th of each month. You also get the stamps before they are available for purchase on the website. They also give subscribers a 10% off coupon to anything else on the website that is automatically applied to your account! No crazy codes needed here!

**Note: This review is not sponsored in any part by Brutus Monroe. The subscription was purchased by me and opinions are my own.**

Signing up, I was a little confused about when I was going to get my first stamp set. So I thought I would clarify here in case you were confused as well. All orders ship by the 15th according to their website. So I thought If I ordered before that dat I would get that month's stamp. However, regardless of when in the month that you order, you get the following month's stamp as your first order. So for me, I ordered October. 13th and my first stamp set arrived November 6th. The actual date you receive your stamp will vary based on where you live and when they ship them out, however I thought this would give you a better idea when to expect your stamp.

Month - November 2017


November's Stamp set is so cute! This 3x2 inch stamp set includes 6 images! I have to say I really like this stamp set. The main stamp is a beautiful vintage style ornament reminds me of my grandma's old Christmas ornaments. It's classy and intricate. The remaining stamps in the set are 5 smaller images that can be used as accents or making backgrounds.

What's in the package?
     My stamp arrived in a standard envelope with just the stamp set inside. Nothing fancy, which probably helps save on shipping costs. I have no problem with that! :)

CB Breakdown

  • Cost -
    • $5 a month which includes shipping and handling!

  • Value -
    • On Brutus Monroe's website their 2x3 stamps typically retail for $3.99 but shipping can be steep! When I went to add a stamp to my cart it estimated my shipping to be over $4.00 just for one 2x3 stamp. So with that in mind, the subscription is a great deal!
    • You also get 6 stamps in the set which I feel makes it very versatile and allows you to mix and match with other stamps sets you may have in your collection.
    • Taking the shipping out of consideration, $5 is more than I would typically spend on a stamp set this size. Looking around the internet most stamp sets of this size retail for $3 to $4 which is consistent with their standard pricing on the Brutus Monroe website. So for the stamp it self, you pay a little more to get it ahead or everyone else and shipped, which isn't terrible.

  • Quality -
    • The quality of these stamps is amazing! Typically when I get a new stamp set the images don't stamp clearly at first and I have to ink them several times. This was not the case here! I was really nervous because of the amount of detail in the stamps Below is my first stamped image using the main stamp in the set, as well as a comparison between the packaging and the stamped images.
 

    • All of the images stamped beautifully! I am incredibly impressed with the quality of these stamps!

  • Creativity - 
    • I really enjoy the style of this stamp set! It's vintage holiday theme is very different than the cutesy Christmas stamps that are really popular right now. I like that it is a unique take on Christmas stamps.


  • Usefulness -
    • This stamp set arrived just in time for the holiday season which makes it perfect to use for making Christmas cards.
    • My complaint here is that the ornament does say Merry Christmas, so if you don't celebrate Christmas it is not going to be as useful for you. The small images are pretty holiday generic so those can still be used but the main image of this set is very specific to only Christmas. But being a Christmas/Holiday set you are still limited with the amount of use the stamp can receive. However, the two small present images could be used year round with other stamp sets so that is a plus.

  • Overall Satisfaction -  
    • I am glad that I received this set. I think I will be able to get a lot of use out of these stamps.

Overall Rating: 17/20
Value Rating: 4/5
Quality Rating: 5/5
Creativity Rating: 5/5
Usefulness Rating: 3/5
Thanks for reading! Stay tuned for some fun projects coming up using this stamp set! :)

πŸ’‹ Besos,
        ~Becca

Monday, October 9, 2017

Pumpkin Spice

Grab yourself a pumpkin spice latte and let's craft!

I am ecstatic I was able to snag the Pumpkin Spice It Up stamp set from Simon Says Stamp and The Greeting Farm! This was my favorite stamp set released during Stamptember! Like look how cute these stamps are...

The Greeting Farm PUMPKIN SPICE IT UP Clear Stamps SSS101785 Stamptember Exclusive Preview Image

😍😍


I was really inspired by Nichol Spohr's card she made using this same set. Check out her card here.


I have been loving using the brick stencil by Tim Holtz. I loved the look of the brick background on Nichol's card and thought it would be fun to use here too. I wasn't originally planning on making a blog post about it since I was trying a lot of new techniques and I didn't think would work out. I was presently surprised when they actually did, though I had several hiccups along the way. So I apologize for not having color names for the products I used. I just really wanted to share because I am in love with these cute images!

I colored the images using Copic markers and the background and sentiment banner were done with Distress Inks.

I originally wanted to make a single layer card, mostly because I HATE fussy cutting. I used a masking technique to layer the images using post-it notes. However, when coloring the images one of the markers dripped so I had to fussy cut out the images and make a new background. It ended up being a lot easier than I thought it would. I just adhered everything with a tape runner. I added accents with a white gel pen, glossy accents on the glasses, wink of stella on the bow, and liquid pearls for the whipped topping on the coffee.


I LOVE this stamp set! I can't wait to make more cards with it! Let me know what you think!

Besos πŸ’‹
     ~Becca


Sunday, October 1, 2017

IT's Finally October!


See what I did there?

IT....🎈

πŸ˜‚πŸ˜‚πŸ˜‚πŸ˜‚

Well if not, you will get it soon enough...

October is one of my favorite months of the year! I love fall, Halloween, and yes, even Pumpkin Spice everything! So immediately I had to get into the Halloween spirit immediately! So wearing my skull leggings I got to crafting today and I can't wait to share my projects with you!!

I am relatively new to stamping, so I feel like I am discovering new stamp companies all the time! One of my favorites I just discovered is Kindred Stamps! Kindred has all kinds of fun geeky images that my nerd heart just loves! If you haven't checked out Kindred Stamps yet, you NEED to. So click here and check out their awesome products.  I will wait... hahaha πŸ˜‚ 

Aren't they perfect!!!

Anyways... This week Kindred Released their first set of digital stamps with the adorable set, Horror Cuties! Seeing as I am still obsessed with IT after seeing it in Imax, I felt this was the perfect place to start my Halloween crafting! Take a look at all these adorable stamps!

Horror Cuties DIGITAL STAMPS

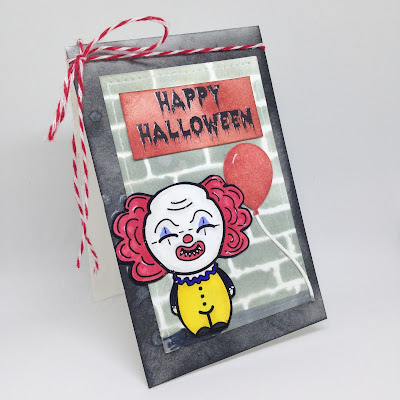
Today I made two fun cards using the Pennywise image from the set! I am not really familiar with the original movie, so I wanted to try making both a classic and modem Pennywise using the images. I printed a bunch of the images from the set several times on to Neenah 65lb Cardstock. Using my Spectrum Noir Markers and a Copic Multiliner pen I went to work coloring and altering the images.

Classic Pennywise Mini - Card


Keeping the image as-is, I colored the image using my Spectrum Noir alcohol markers.
     Colors Used:
          Hair: CR8 and CR11
          Face: IG1 for shading of the face; TB3 for above the eyes; CR8 for mouth and nose
          Clothes: TB6 for sleeves and ruffles; CT2, CT3, and CT4 for the body; IG10 for the shoes
          Additional: True Black for the sides and a white gel pen for accents and the teeth

Once he was all colored I fussy cut out the image and added black to the edges using a marker to make it look like a finished product.

For the card base, I took a standard size card base that I already had premade and folded. The dimensions were 5.5" by 4.25". I then cut the card directly in half at 2.75" making the card 2.75" x 4.25". This gives me two mini cards to work with!

Then I began my work on the background elements! I cut out a small rectangle using the Stitched Rectangle die set from Lawn Fawn. I choose one of the smaller ones since I knew this was going to be a small card. I also used the Party Balloons die set from Lawn Fawn for the balloon and string.

Then I taped the stitched rectangle to the back of my Tim Holtz Layered Brick Stencil and began applying the Distress Oxide ink with a dauber. For the bricks I used the Iced Spruce color. I then just applied regular distress inks to the card base, sentiment, and balloon. (The sentiment was just typed up and printed when I printed the images) For the balloon and sentiment background I used Fired Brick Distress Ink and I used Black Soot Distress Ink for the card base. I apply some water droplets to the card base using a mister and picked up the excess water with a cloth. This resulted in the cool water droplet effect.

I then adhered everything together using a generic tape runner and tied a piece of twine to the top just to add some extra flair. Once things were applied I added just a little bit of gray to the bottom of the rectangle so it didn't look like Pennywise was floating, (however that may have been appropriate since they all float right?) From start to finish this card took about 15 minutes which is great! These images are so cute and make for some perfectly spooky Halloween Cards!


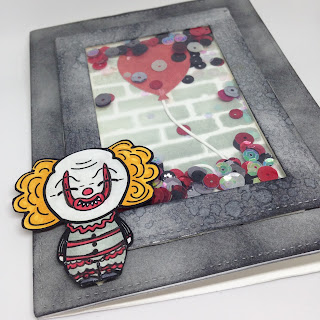
Modern Pennywise Shaker Card


This was my second Pennywise card using the Kindred Stamps set! I have wanted to try making a shaker card and this was my first attempt! Trust me, it is far from perfect but I will share what I learned along the way!

Personally, I have never been much of a scary movies person. But my fiancΓ© was so excited for the new movie that he dragged me to see it! And honestly I was terrified but I loved it! I was really impressed with the art direction of the film. It had a much different look and feel than the original but with the same great 80's feel. I wanted to capture that version of Pennywise using this stamp set so I had to alter some things. The above card used the image as-is, but for this card, I used the Copic Multiliner again to add more detail to the clown.

First off I drew the red lines extending from the mouth and past the eyes. I actually started with the red marker and then outlined with the Copic Multiliner, This way I could avoid accidently coloring outside of the lines on his face. I then drew in the stripes and ruffles on his body, as well as adding in as little pompom on his shows. It was a quick way to change the feel of their clown, and I think captured the unique attire of the new film's version.

Colors Used:
          Hair: OR1 applied inlayers for shading
          Face: IG1 for shading of the face; CR8 for Makeup, mouth, and nose
          Clothes: IG2 and IG4 for his clothes; CR8 for accents on the clothes, IG10 for the shoes
          Additional: True Black for the sides and a white gel pen for accents and the teeth

I used the Stitched Rectangle die set from Lawn Fawn for the card base and insert. I used the largest three sizes. The largest for the card base and the other two to make the frame. Using the Black Soot Distress Ink, I colored in both pieces of the background using a dauber. Using the same technique discussed above, I made another brick background using one of the stitched rectangles and another balloon. This was then adhered to the card base.

I attached the acetate sheet to the back of the frame using super sticky double sided tape. I then put a layer of foam tape on the back side of the frame. **NOTE: I should have doubled up the foam tape! I recommend using two layers of foam tape. This will help the sequins shake around better.** Then I used a static reducing powdered tool and made sure the card base was coated as well as the frame. This prevents the sequins from getting stuck or sticking to a corner.

Then choose your sequin mix and add them to the card base! I choose black, reds, and iridescent sequins and glitter. I set them in a pile on top of the balloon which I knew would be far enough away from the sides. Then I removed the backing on the foam tape and applied the frame to the card base. Once everything was secure, I attached Pennywise to the card using more foam tape. On the parts of his body that were hanging off the frame, I doubled up on the foam tape for extra support.

And that's it! This card was a little more time consuming but I love it! Shaker cards are so much fun!!!


Hope you all enjoyed these fun and spooky Halloween cards! Leave me a comment and let me know what you think! I would love to hear from you! Cant wait to share more cards using these spooky sets from Kindred Stamps! Don't forget to follow us on Instagram here for first looks at our latest projects!


Besos πŸ’‹
     ~ Becca


Saturday, September 23, 2017

Welcome!

Welcome Everyone!!


I am super excited to start this journey with you all! First off, how about introductions!

My name is Becca! I am one of the faces behind Crafting Besos. I am a 20-something crafter from Michigan, USA! I love making all kinds of different things, but papercrafting is my favorite!

The other face behind Crafting Besos is Sofia! Sofia is a 20-something artist from Monterrey, Mexico. Sofia loves drawing and making awesome DIY projects with her Cricut!

Sadly, Sofia and I don't have any pictures together (for now!), but here is a picture of us as Funko Pops. Which honestly, it is pretty close to the same thing! :)
Sofia and I met due to our love for the show Once Upon A Time! We are both big fans of the show, especially the Evil Queen. #EvilRegals ❤ Although we live very far apart, our friendship is something that knows no distance! We are both really creative people and huge nerds! ✌ So you can expect a lot of fun and nerdy projects from us in the future.

We are really excited to share our projects with you and hope to create a fun and inspiring community where we can share the love and inspiration! We have a lot of fun ideas planned so make sure to stay tuned for awesome giveaways and freebies!

So where did the name and idea for the blog come from?


Starting a blog and becoming more active in the crafting community is something I have always wanted to do, but always get to scared to actually try. My best friend Sofia is such a talented artist that I have always been urging her to share her art more too. So we decided to go into this together and combine our art forms in a way where we can both support each other. We wanted our name to be a combination of our languages and thus Crafting Besos was born. Besos means "kisses" in Spanish. :)

Who does what on the blog?


There is no real plan as far as who does what, so you will probably see different posts from both of us as time goes on. Starting out, I will probably be running the blog and posting my projects while Sofia is hard at work making awesome images for us all to use! Sofia is the one who made our beautiful logo at the top of the post! We are both students so our schedules are pretty crazy, but we will try to have at least one blog post a month!

If you think of any other questions, leave us a comment! We would love to hear from you! We are looking forward to this journey and getting to share our passions with the world!

Make sure to follow us on Instagram: @craftingbesos

Besos πŸ’‹
     ~ Becca


Birthday Card Fit For a Princess

Next month my beautiful niece is turning one! I cant believe it! For her birthday, her parents have asked for everyone to write a card for h...